Scan folders, FAST

The fast scanning mode uses an interface similar to the Query DICOM servers or PACS interface. The results are displayed in text, with a different panel for each patient, study or series. No DICOM image is shown. This results in a fast overview of the scanned folders and subfolders, up to 20x faster (depending on the source of the DICOM files: local, network, removable media).
Select patient, study and/or series panels to load into the overview window. Use the Ctrl-button to add or remove a panel to the selection, use the Shift-button to add or remove a range of panels. You can select multiple panels of all types. Press the 'Load' button to load the selection in the overview window.
Enable the fast scanning mode in the settings window. Go to 'Scanning mode' and choose 'FAST'. All scanning tools will now scan in the fast mode.

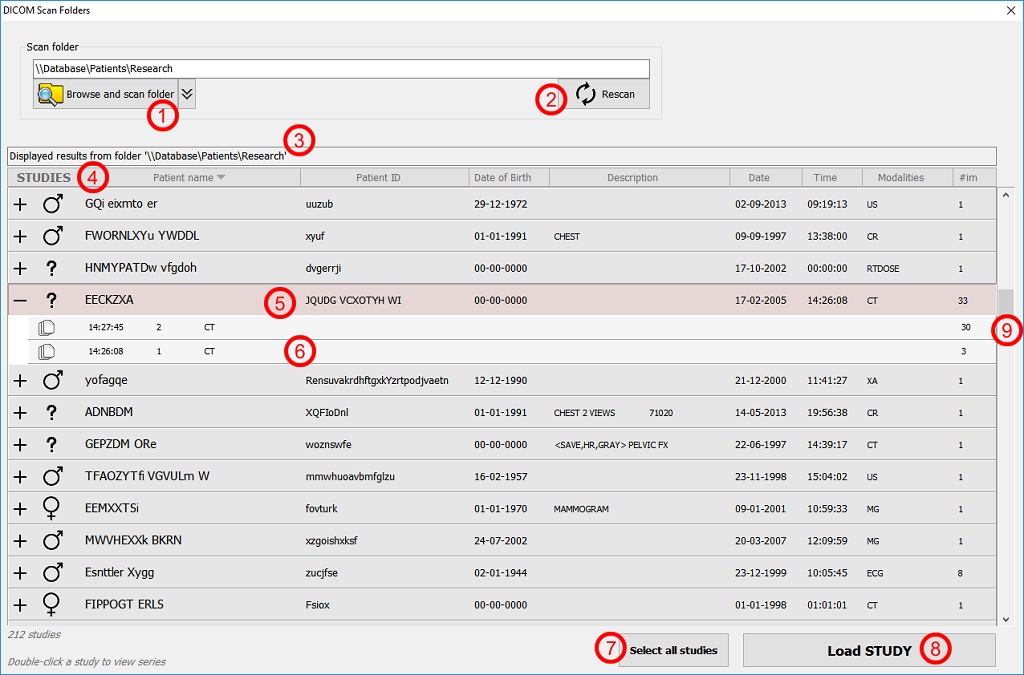
The fast scanning interface, anonymized data
- 1. Choose one or more folders to scan
Click 'Browse and scan folder' to choose which folder(s) and subfolders are searched for DICOM files. The searched location is displayed in the 'Scan folder' box above and added to the scan history list. Open the scan history list by clicking the pulldown button. The last 10 folders, including the default Retrieved and Received folders, can be clicked for fast scanning.
- 2. Rescan/Stop scanning button
Rescan the folder in the 'Scan folder' box by clicking this button. During an active scan, press it to cancel the scan.
- 3. Source of the scan
This box displays which folder(s) were searched to create the results below.
- 4. Sort panel, studies
The sort panel displays what data is shown in the study panels below.
Study panels show -patients' name, -ID, -date of birth, description, -study date, -study time, available modalities in the series and -number of instances found.
Click on any item in the sort panel to sort by that item. Click again to switch between top-down of bottom-up sorting.
Switch between patient display and study display, by clicking on the first item ('STUDY').
A description of the sort panel in patient mode can be found here, number '5'
- 5. Study panel, selected
Study panels in study mode (as displayed here) show an -expand image, an -image of the sex, -study date and time, -patient ID, -available modalities in the series, -study description and -number of instances (i.e. DICOM files).
Click the expand image ('+', or double-click the panel) to display the series of that study, click the collapse image ('-', or double-click the panel) to close display of the series.
A description of the study panel in patient mode can be found here, number '7'
Select a study panel by clicking on it. Is will be pressed down and colored to indicate the selection. Deselect the panel by 1) clicking (and thus selecting) another panel, 2) clicking on any empty space next to a panel (f.e. just left of a study panel in the example) or 3) by holding the Ctrl-button and clicking the selected panel.
Select multiple studies or series by holding the Ctrl-button and selecting other panels or by holding the Shift-button to indicate the end of a selection-range. In the scanning interface you can select panels of different types.
If a selection is made, the 'Load' button will be enabled and show what will be loaded when pressed. See also number '8'.
- 6. Series panel
Series panels show -an image indicating a series, -series time, -series number, -modality, -description and -number of instances (i.e. DICOM files).
- 7. Select all studies
Click to select all studies from the list. Deselect studies by clicking on any panel or hold the Ctrl-button while deselecting specific studies. A combination of the Shift+Ctrl-buttons makes it possible to (de)select a range of panels.
- 8. Load button
Load the selected panels into the overview. Use the Ctrl-button to add or remove a panel to the selection, use the Shift-button to add or remove a range of panels. In the scanning interface you can select multiple panels of all types.
- 9. Scrollbar
Use the scrollbar to scroll through all available panels.


